How To Increase Crochet Circle
How To Increase Crochet Circle - Coasters, place mats, face scrubbies, bags, purses, beanies,bucket hats, baskets, rugs, pillows, blankets, you name it! Learn the easy technique london kaye. Web in this tutorial, i will show you how to crochet a circle step by step, with a detailed photo tutorial and an easy magic formula that will make the circle lay. If you begin with 8 sts, then you’ll increase by 8 each round and so on. That’s it in it’s simplest terms! Each round, you increase evenly by the same number of stitches. Web unlike crocheting in rows, where you turn your work at the end of each row, crocheting in a continuous round allows you to create a seamless, spiral pattern. The increases are marked in yellow below. Web once you get your crochet circles right, you can create so many beautiful projects: Web the swatch below is the most common way to make a flat single crochet circle. Web if you’ve ever crocheted a round motif, such as a circle or mandala, you may have wondered why the circle sometimes ruffles or curls. Lots of crochet patterns begin with a circle. Web learn how to crochet circles that lay flat. You will then crochet into the center circle and increase with a formula in order to keep your circle flat. Increasing crochet in the round. Then, lift your index finger and place the yarn behind the finger. Increase formula for flat circles. The increases are marked in yellow below. Regardless of what crochet stitch you will use for the circle, you need to know several rules which keep your crochet circle flat. Web to increase in crochet, you will need to add more stitches to your row, which will increase your stitch count. This will also give you a foundation for learning how to crochet similar circles in other stitch patterns. Web if you’ve ever crocheted a round motif, such as a circle or mandala, you may have wondered why the circle sometimes ruffles or curls. Web by increasing the number of stitches, you can create curves and circles or add dimensions to. Web the swatch below is the most common way to make a flat single crochet circle. We begin with 6 stitches in the round at the center, and then make 6 increases per round as we crochet in a spiral, placing each increase at the beginning of each stitch repeat. Coasters, place mats, face scrubbies, bags, purses, beanies,bucket hats, baskets,. This will also give you a foundation for learning how to crochet similar circles in other stitch patterns. Wrap it around your finger twice, going forward from this back position. Web to increase in crochet, you will need to add more stitches to your row, which will increase your stitch count. Lots of crochet patterns begin with a circle. Joann. The way that you increase your crochet stitches in the round, will impact on the ability to crochet a flat circle. Sl st to first sc made to close. Increase formula for flat circles. Web how to crochet a flat circle every time with the magic increase formula. I have included step by step pictures and a video below for. If you begin with 8 sts, then you’ll increase by 8 each round and so on. Web how to crochet a flat circles. Whichever stitch you are making, the method of increasing is the same. Web to increase in crochet, you will need to add more stitches to your row, which will increase your stitch count. Fortunately, there is a. 950k views 6 years ago. That’s it in it’s simplest terms! Each round, you increase evenly by the same number of stitches. In this blog post, i’ll guide you through how to crochet in a continuous round. Web if you’ve ever crocheted a round motif, such as a circle or mandala, you may have wondered why the circle sometimes ruffles. That’s it in it’s simplest terms! Web to crochet a flat circle, you start by making a round of stitches into a magic ring or a loop of chains. If you begin with 8 sts, then you’ll increase by 8 each round and so on. Increase every round by initial stitch count in the first round. Web how do you. Web how do you crochet an adjustable circle? Each round, you increase evenly by the same number of stitches. We begin with 6 stitches in the round at the center, and then make 6 increases per round as we crochet in a spiral, placing each increase at the beginning of each stitch repeat. There are two ways to do this,. For example, in the first round, you started with 6 stitches. The number of stitches you work into that first round, and increase by each subsequent round, will depend on the stitch you are working. Learn the easy technique london kaye. With your left palm facing you and your fingers to the right, lay the yarn in your hand, with. Web how to make a perfect crochet circle. Web if you begin with 6, your stitch count will increase by 6 each round. Let’s take a closer look at what causes these problems and how you can easily solve them. You can make a circle of any size by following these instructions because you will learn exactly how to increase. Web how to crochet a flat circle every time with the magic increase formula. Wrap it around your finger twice, going forward from this back position. 950k views 6 years ago. Make the increases in different places of the repeat. Mastering the crochet increase technique is important, as it allows you to control the shape and size of your project. 😀 just look at the difference it makes! Increase every round by initial stitch count in the first round. Web if you’ve ever crocheted a round motif, such as a circle or mandala, you may have wondered why the circle sometimes ruffles or curls. Web learn how to crochet circles that lay flat. In this blog post, i’ll guide you through how to crochet in a continuous round. Web once you get your crochet circles right, you can create so many beautiful projects: Web unlike crocheting in rows, where you turn your work at the end of each row, crocheting in a continuous round allows you to create a seamless, spiral pattern. With your left palm facing you and your fingers to the right, lay the yarn in your hand, with the end above your index finger. To make the circle larger, you’ll need to increase the number of stitches in each round. We begin with 6 stitches in the round at the center, and then make 6 increases per round as we crochet in a spiral, placing each increase at the beginning of each stitch repeat. Then, lift your index finger and place the yarn behind the finger.
How to Crochet a Flat Circle Magic Increase Formula Sarah Maker

TIP 1 TIP for INCREASE SINGLE CROCHET How to make a perfect circle

How to Increase Crochet in the Round for beginners
:max_bytes(150000):strip_icc()/24_dc_circle_increases-57561fa63df78c9b46c9398a.jpg)
How to Increase Double Crochet In Circles

Crochet Round Increase Chart

How to Crochet a Circle With Increases 11 Steps (with Pictures)

How to Crochet a Flat Circle Magic Increase Formula Sarah Maker

After crocheting a circle, increase stitches allow to make the circle

Crochet for Beginners How to Increase in a Magic Circle YouTube
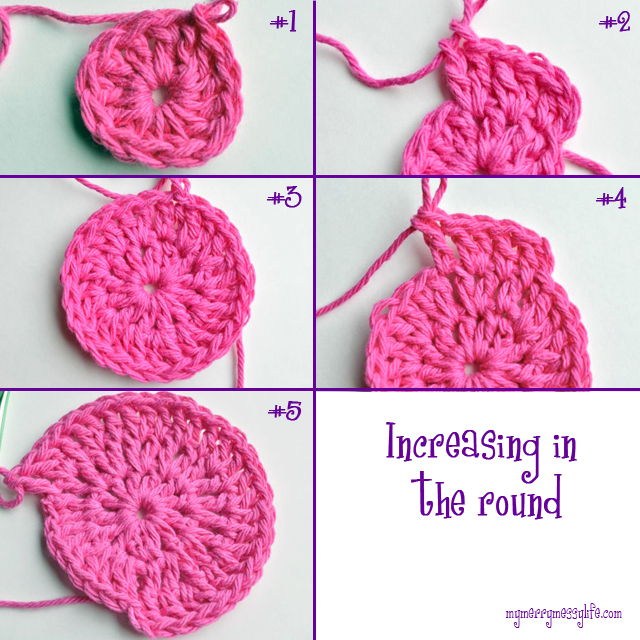
Increasing and Decreasing in Crochet {free crochet tutorial} My Merry
Web When You Crochet In The Round You Need To Make Increases Every Round So That Your Circle Will Remain Flat.
Regardless Of What Crochet Stitch You Will Use For The Circle, You Need To Know Several Rules Which Keep Your Crochet Circle Flat.
Web In This Tutorial, I Will Show You How To Crochet A Circle Step By Step, With A Detailed Photo Tutorial And An Easy Magic Formula That Will Make The Circle Lay.
Joann Fabric And Craft Stores.
Related Post: